Friday, October 26, 2012

THANKSGIVING TABLE STETTING AND DECORATION


The table is set...now I just have to wait!  I really wanted to use the burlap table runner I made a few weeks back. (The instructions for the runner is under a post called; NO SEW BURLAP BOW TABLE RUNNER)  I know burlap and gold are not typical...but I feel like they worked well here!


 This years table is a bit fancy and yet the burlap gives it a natural kick that I really like.  I made this arrangement to sit on the dinning room table until the big day.  I know, I know... it is not an appropriate Thanksgiving  center piece for the actual Thanksgiving dinner. It is entirely too big to see over. It will, however, look fabulous until the big day. I have made a lower version that will replace this one on the actual day.   I used all of the same flowers, picks, and natural accents that I did earlier when I made the wreath and arrangements for the front door. The fall picks and flowers are all on sale at the craft stores so it can be done pretty cheaply. 
 The Thanksgiving center piece I made for the actual dinner is sort of a cheat.  It is a quick and easy center piece.  It serves well because it is both beautiful and functional.  A center piece should be in scale with the table and at a heigth that is low enough to see over. Who wants to talk thru a center piece? The best view really is from above....
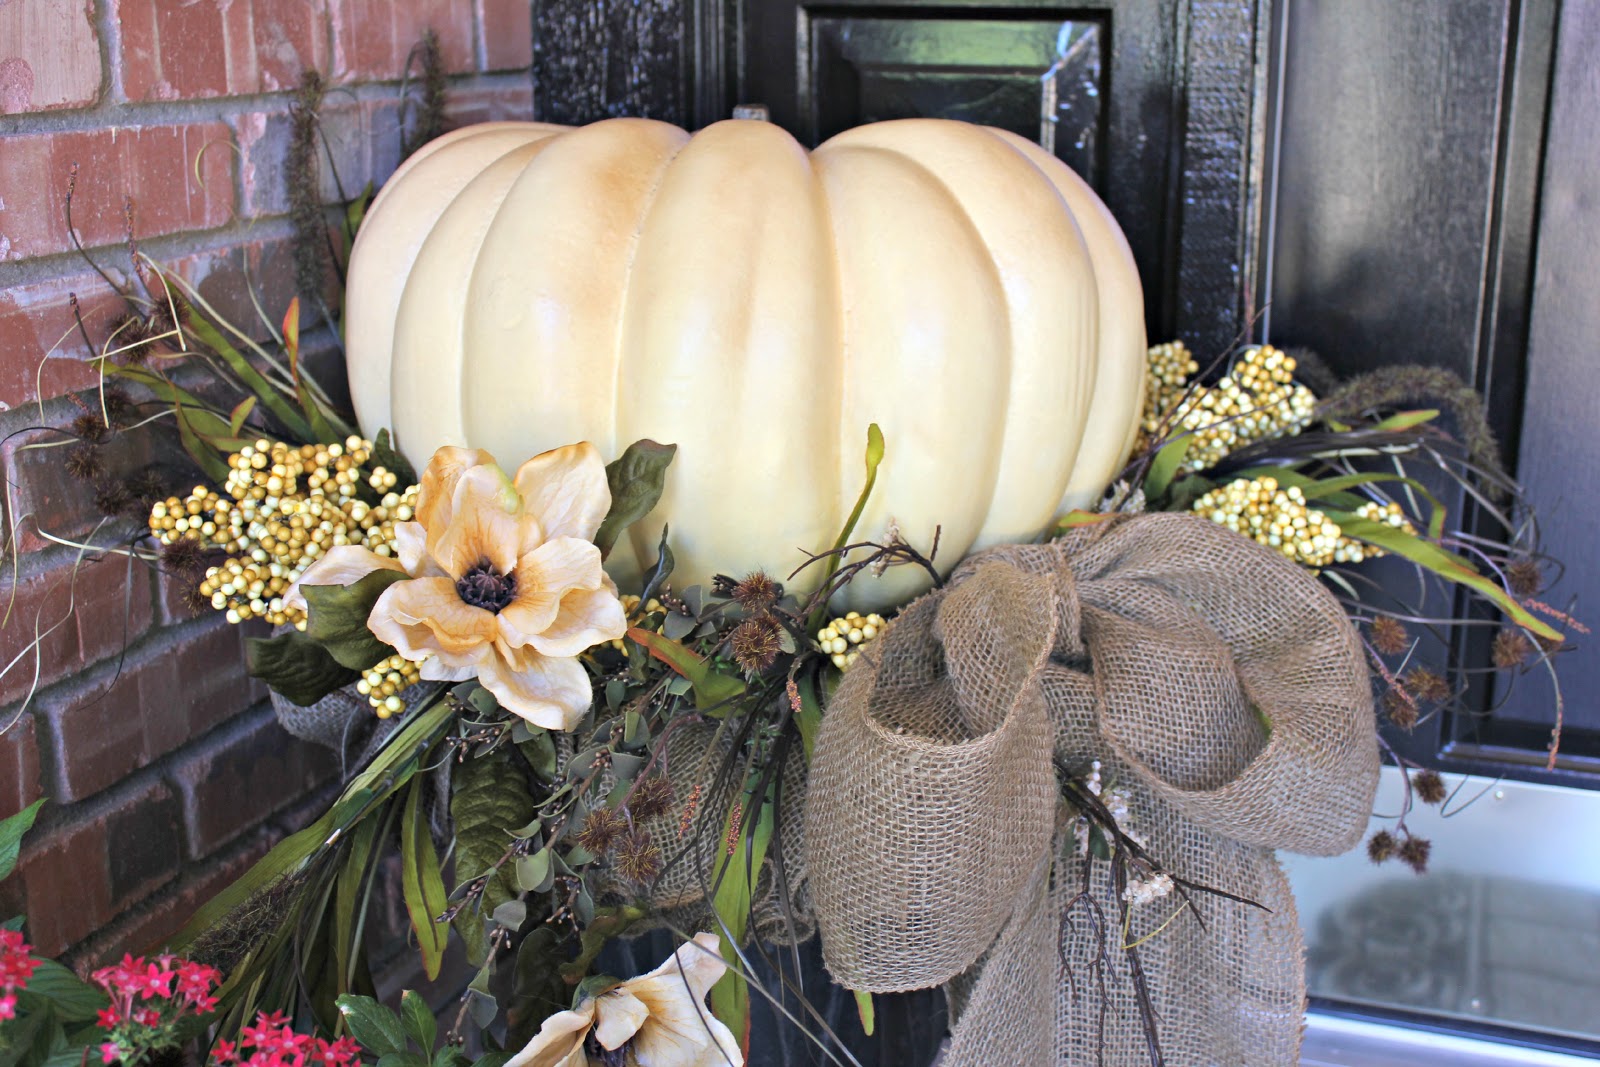
I tied two large bow out of burlap ribbon.  I left the tails a pretty long.  I wanted them to lay almost the entire length of the table.  
 Lay them across each other like below.  If you will notice there is a ruffle of burlap underneath the two giant bows.  This is not necessary, I just had one...so I used it. 

 Then just start shoving the picks in.   I put some of them under the bows and a few smaller ones in the folds of the bows. 

I simply nested the white pumpkin in the cross section of the two burlap bows.  

Next, I "fluffed" the bow parts of the center piece.  I wanted it to be as full as possible.   Last, but not least....a little gold glittered leaf. This gold leaf ties in the center piece and the little squash that sit on the plates.  
   This center piece is quite easy. It is only big bows of burlap with picks shoved underneath.  The white pumpkin just sits in the middle of the bow. It could not be easier.  
 I loved using these little squash on the plates.  I bought them in the produce department at Walmart.  I simply tied a gold glitter leaf on the stem of the squash with a string of burlap.  Another fine mix of bling and natural! 
 The squash were about .80 cents a piece and I bought a pack of  8 gold glittered leaves at Hobby Lobby for $2.99.  
 The gold chargers run about $1.99 at Michael's, the glass plates are from the dollar store, and the gold and white plates came from World Market...I have had them for a little while.  They were in the clearance section for .50 cents a piece.  I love me a good clearance section!  Sorry to disappoint but, the napkins are a high quality paper napkin...I don't want to do one more piece of laundry than necessary.  When you have a good disposable option...use it! 

Next project...the kids table!!!

Wednesday, October 24, 2012

Fall and Thanksgiving crafting preperations

Ridiculous as it sounds...I think people have WAAAY too much time on their hands!  I keep seeing all of these crafty "items" people are making out of toilet paper tubes. Who knew!?! Props to all of the toilet tube crafters out there!  I can't decide if we (yes, I am including myself in the group) are bored or just crazy!?!  In my case...after some careful thought...I am pure CRAZY! I boldly add my toilet paper tube craft to the ever growing and quite popular toilet paper tube craze going on right now!
TA-DA......the worlds first toilet paper tube cornucopia! Do you think this is what the pilgrims had in mind at the first Thanksgiving?
Turns out this cornucopia is an easy Fall and Thanksgiving craft for those of you who are so inclined.  Please enjoy!
 I began by cutting one side of the tube inward, leaving only an inch to an inch and a half on the other side. 
 Next, tightly roll inward one side of the new cut.  This helps create the "cone" effect.
Then, wrap the next side tightly down over the first roll.
Make sure you roll tightly so the cone is nice and sharp.  Secure out side flap with hot glue.  
Wrap and glue the open end with burlap, leaving at least an inch over hang to tuck and glue inside the cornucopia opening.   

 cover and glue the pointed end of the cone with burlap.  
Wrap and glue the cone with a strip of burlap 1/2 to 3/4 of an inch.
The burlap doesn't wrap smoothly.  Don't worry!
I followed the burlap up with several long pieces of the Jute (pulled from the burlap)  I used a small amount of glue to secure one end of the jute to the tip of the cone and after wrapping it tightly around the cone I secured it again with a small amount of glue.  This held it in place nicely!
To keep the cone pointing up, I tied three bows and glued them to the bottom of the cone.  
The bows secured the cone.
 And because I bow everything...the cornucopia got a giant bow!! I can't help it, I love beautiful ribbon.  My good friend Jeff brought me a giant roll of the most beautiful orange ribbon.  It was perfect. 

The burlap cornucopia is a perfect little vehicle for a Thanksgiving treat.  It will serve as a place card holder at my Thanksgiving table.  The little treat that fills the cone is a candy covered mint chocolate ball.  I loved the white color...plus I love mint chocolate!

Wednesday, October 17, 2012

PORCH DECORATIONS THAT EASILY TRANSITION FROM HALLOWEEN INTO THANKSGIVING. FALL BURLAP AND WHITE PUMPKIN WREATH FOR FRONT DOOR.

CALLING ALL TRICK-OR-TREATER'S...THE PORCH IS READY!!!!!  I am excited for the little monsters to start knocking!  I didn't want to work too hard this year transitioning from Halloween into Thanksgiving. I'll be honest, the minute the minute Halloween is over I want all of the decorations gone! I like to take my Halloween decorations down THAT night!  I fashioned the front porch pots so they would serve me well at Halloween and also transition quickly into lovely Thanksgiving Decorations.
 These black pots grow flowers for most of the year.  I usually do some type of pumpkin arrangement in them until Christmas when they are then filled with poinsettia's. This year I decided to make them to coordinate with my new wreath. I began by ruffling burlap ribbon and gluing it to a circle of foam board.


 I made the circle just large enough to cover the top of the pot.  It will be held in place by the floral picks I will be using.  They will stick into the foam board and than into the dirt beneath. 

I will be able to change the picks and reuse the holes for the floral picks I will use for my front porch Thanksgiving decoration.    
I glued sticks into the bottom of the giant pumpkins.  This will allow me to stick the pumpkin right into the center of the foam board and down into the dirt beneath.  Perfect!...BUT... also easily changeable. 

 Nothing is complete without ribbon.  I love them! 
 
 I think they make simple Halloween porch decorations that will also work beautifully for Thanksgiving.  This change will be quick and easy!  I removed the Pumpkin and the Halloween picks.


 I replaced the Halloween with Fall stems using the same holes. This way they make a great Thanksgiving DecorationA smaller version of this would make a great Thanksgiving center piece.
And then stuck the pumpkin back in.
I reused the burlap ribbon from the Halloween arrangement and put it in the Thanksgiving arrangement. 
The porch went from this...

To this in just a few minutes.  Easy Transition!


   I made a new wreath for the Fall/Thanksgiving season. 

The twig wreath was 5.99 at Hobby Lobby. 


I wanted the Thanksgiving wreath to be big but didn't want to spend a ton of money doing it.  I bought a roll of burlap for 4.50 at Joann's.  I ruffled it and hot glued it to the back of the wreath.  This substantially increased the size of the wreath without having to spend a lot of money.  
I began with "wheat" looking stems and picks of dark green leaves. This creates nice contrast but keeps the wreath simple.  
I use hot glue on the end of the picks and stick them right into the twig wreath. 
I added sticks to the bottom of the pumpkin and glued the sticks right into the wreath. 


Next I  added flower picks and berries.  I chose things that are all of a similar color.   

  I glued in a giant burlap ribbon. 
And last...several layers of twine bows.  This adds good texture without making the bow too busy. 
I am happy the way it turned out and I am excited to put it out!  If you drive by my house after 9:00p.m. Halloween night I will be out putting this up!  I am ready for Fall.  Making a wreath yourself is easy.  You can get a lot more "look" for your money.