Friday, October 25, 2013

HALLOWEEN FOOD AND GAMES WITH AZ CHANNEL 12


Halloween Party!!!!!! YEAH!  A little early celebrating never hurt anyone!  Games are always a good place to start! 

First, “PUMPKIN PUTTING”,  Such a funny game to watch!  Not a bad game to play either.  The object is to swing the pumpkin in the black lace stocking and hit the giant golf ball.  This game can either be played as a team relay, a one-on-one race, or into a bucket for accuracy.   I have simply purchased knee-high black lace and fishnet stockings.  There is a small pumpkin place in the toe and then the stocking is tied off. Another knot is tied at the top of the stocking. (I have also tied cute ribbons here) this knot will act as a handle of sorts.  The lace and fishnet stockings are very elastic and bounce really good.  It takes a bit of coordination to get the pumpkin to swing right. 

Next, “HAUNTED HANDS CANDY GRAB”,   Again, I love watching this game.  This can be played as a one-on-one game or as a relay race.  Each player is to race to get witch fingers on each of their fingers.  Once they have witch fingers on, they race to unwrap a piece of candy.  They winner is the first player with the candy in their mouth.  If playing as a relay, once the player has the candy in their mouth they take off the witch fingers put them back in the bowl and the next player on the team takes a turn.  The game is over win there is a team with each player completing the task. 


What is a party 
without food?  Grandma LaRae Belnap in Idaho shared her “White Chicken Chili” with our family.  My sister makes this often and it is D-lish!  It quickly became a family favorite.  The good news is, it is an easy one.  I love with good flavors come together with little work!  It is served with fresh cilantro, cheese, fried tortilla strips, and or Frito's. (Cheater Alert!!!!! As a bonus factor: it also works well made the day ahead and reheated.) I served this White Chicken Chili it from a black witches caldron... which of course made it look super spooky!  


I know they get enough candy and treats really are not necessary, (here comes the big BUT) But, my daughter and I enjoy making things together in the kitchen.  She is still young and so I find things that she and I can do together that make her feel like she is cooking up a storm.  I love that she likes to be in the kitchen with me!   
These are all easy to have the kiddies help with.  I melt the chocolate and let her dip.  She loves it! 
 I like to buy anything orange that can be dipped in chocolate for our Halloween party.  It always looks festive and we love them!  These are fun treats to have out for a party or package up to handout to friends.   
 On a healthier side...not that the following suggestions are healthy.  They just involve fruit and at Halloween, that means healthy! I have also put together a dried fruit and nut mix.  This is a mix of tropical fruit; mango, papaya, pineapple, and banana.  There is also coconut, raisins, and salty nuts.  I bought the dried fruit and chopped it so the pieces would be consistent with the raisins and nuts.  Next, I spread the mixture out on a cookie sheet and drizzled both regular chocolate and white chocolate over the top.  This will need just a few minutes in the fridge to allow the chocolate to harden.  This can be served in a bowl with a stack of party cups on the side.  It also packages well as a gift.
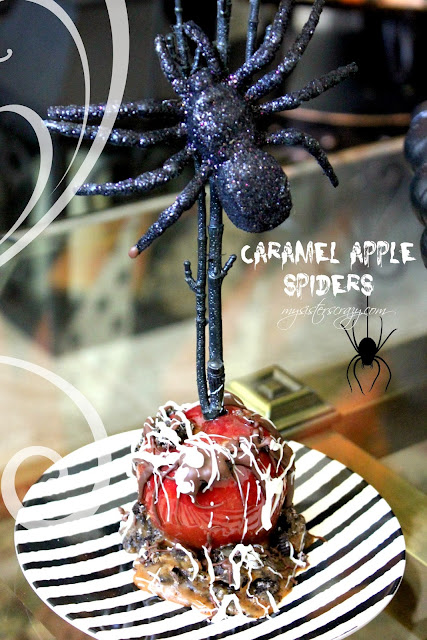
We have also made some Caramel Apple Spiders this year.  I usually don't make them because the kids eat all the caramel off the outside and through away a huge nice apple.  I hate all the wasted apple. This October, Walmart carried the tiniest apples I have ever seen!  They are only about two and a half inches, adorable! I couldn't resist!  We used floral picks as sticks.  The floral picks are black, glittered, and had a giant spider on them.  I figured since you don't eat the core of the apple, it didn't matter what we used for the stick!  They were dipped in caramel and then in crushed Oreo's and were then drizzled with chocolate.  Perfect size...perfect treat, hopefully no wasted apples! 
 We are almost ready to party!  We will have good food, good treats, and good time! Happy Halloween!


Thursday, October 24, 2013

QUICK HALLOWEEN DECORATING


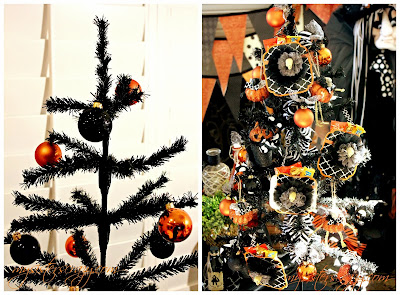
I did some quick updates this year.  They had to simple because I didn’t have a lot of time!  Plus, I am getting older and I get tired a lot easier! I did several things this year that will be simple for me to save and re-use them again next year.  Storage is a problem so I always have to keep this in mind.   My Halloween tree was looking so sad.  It had to get a face lift.  He got a thicken layer of black and white fabric bows.  I really liked how the bows “beefed” up the trunk and added quick color…cheaply! It secrainly was in a sad situation if you ask me.  I know some are fond of the simplicity of a sparse tree.  I however am not one of you. 
Now, it needed a few new decorations.  I wanted to make little treat packets the kids could take off the tree.  I simply did this by gluing the sides of Halloween cards together and attaching ribbon so it could hang.  This is a simple but cute way to give a treat to someone.  No matter what holiday, this technique can be used with any purchased card or just folded paper.  However, I usually buy a pack off cards.   


The stores always have cheap packs of cards or invitations in their dollar sections.  Sometimes buying cut paper can be more expensive then buying then cards.    I also gathered black tulle, grey lace, and added a skeleton head to the center.  AW!!! I am in love!
  While I was ripping dollar store skeleton heads off their bodies,  I thought of something funny for my tree!  I think I am super funny!  These skeleton pumpkin bellied guys are hilarious to me.  I took the little cheap skeletons apart and stuck their legs, arms, and head in the appropriate places.  They were secured with hot glue.  I also love their collars and bow ties.  They were hung with twine.  I could not be happier!

I also made simple black glittered pots that held tiny glittered pumpkin stems I found at the dollar store.  The tiny bit of black and white polka dot fabric is probably my favorite part!  These were also hung with twine.  These little guys are not exactly my favorite but, they did help cheaply fill my tree and add great texture and color.    You always need cheap filler.

Next: quick pumpkin decorating.  I am going to admit that sometimes I forget to carve the pumpkins! They sit undecorated on the porch, how disappointing. I think I do this accidentally on purpose because I hate gutting them.    
This is a “just-in-case” preemptive strike against my unwillingness to acknowledge pumpkin carving!  This year if I accidentally on purpose forget to carve them, they will at least look like we meant to do it!  My daughter loves rearranging their little costumes!  Here is hoping she loves them so much, I don't have to carve them! 
 Our giant pumpkin is just wearing a big hairy mustache!  It is great! It sort of reminds me of like a creepy mustache wearing uncle or a flashback from my childhood...This looks like the mustache my dad wore while I was growing up...can anyone say, EWE!?!
 

FABRIC PUMPKINS...NO SEW!


Ok, so…I am confused! When something says “no sew” doesn’t that mean YOU DON’T HAVE TO SEW IT!?! I am just wondering!  Maybe I am missing something, but just about every fabric pumpkin DIY I have seen still requires me to sew.  Now granted, it is not always with a sewing machine, but does call for a thread and needle.  This is still sewing to me!  I was in the market to remake fabric pumpkins this year.  I searched and searched and could never find anything that I didn’t have to sew. I know it sounds lazy…but, facts are I didn’t want to!   
So, I went back to using my tried and true method!  This is truly a “no sew” fabric pumpkin.  I will also admit that my brain works in mysterious ways and this method makes perfectly good sense to me.  You may find other methods suit you better! Making the first one may seem a little strange to you, keep going!  They are super easy and go together quickly!  I am not a professional fabric pumpkin maker.  Nor, am I an excellent “explainer” of my crazy processes.  I am afraid you will have to make the best of it! 

I will also have you know, I used recycled fabrics.  I am a thriftier, what can I say!  


For the leaves, I use a square of fabric, (sizing depends on how big your pumpkin will be, the bigger your pumpkin, the bigger the square!) I usually  use a square of fabric about 10x10.  Next,  fold the fabric wrong sides together in half and then in half again right sides together.  This makes a nice finished edge that can be used as a leaf.  I then gather the “unfolded” edges leaving the folded point up. 

The fabric for your pumpkin will need to be in the shape of a rectangle. (longer in width then in height) Experiment with this, the wider the piece of fabric, the bigger the pumpkin.  I have made many using fabric that is 36” wide and 18” in height.  Place the fabric face up with the long sides positioned horizontally and place pinched leaves in the center of the fabric.  Now, begin to gather and hold the fabric around the leaves. You may have to do this a couple of times to get the hang of it.   Once this is done, I use a hair elastic to secure the ends.


Now gather the other end and secure with a second elastic.  If you feel like you need to secure this, you can put hot glue around the elastics.  I have never had one come undone.  They are always very tight!
There will be a slit in the gathering from where the sides of the fabric met.  This is where you turn your pumpkin right-side out.  All you have to do now is stuff!  Here is my secret…I don’t buy bags of fiber fill.  They are always more than 8 or nine dollars in my craft stores.  I buy cheap pillows at Walmart.  They are usually around 3 bucks and can stuff a crazy amount of pumpkins!  Once my pumpkin us stuffed, I use a little fabric glue (hot glue works well also) and seal the opening.  These go together so quickly I have a hard time knowing when to stop!  I always do too many!!!!!